Installation (Virtuemart)
1. Install Joomla and Virtuemart
To find out more information about installing Virtuemart please visit http://virtuemart.net/ for more information
2. Upload PayU files to Joomla/Virtuemart installation on webserver
Download the PayU/osCommerce plugin from the github repository: https://github.com/PayUMEA/payu-mea-rpp-virtuemart2/archive/master.zip and unzip the downloaded file.
Upload the folders to the base directory for your Joomla/Virtuemart installation.
Copy the following SQL query onto your Joomla database (If your database makes use of prefixes on the tables, please replace <prefix> with your prefix used in your joomla installation
INSERT INTO `<prefix>_extensions` (`name`,`type`, `element`, `folder`, `client_id`, `enabled`, `access`, `protected`, `manifest_cache`, `params`, `custom_data`, `system_data`, `checked_out`, `checked_out_time`, `ordering`, `state`) VALUES ('VM - Payment, PayU Redirect Payment Page' , 'plugin', 'payuRedirectPaymentPage','vmpayment',0,1,1,0, '{"legacy":true,"name":"VM - Payment, PayU Redirect Payment Page","type":"plugin","creationDate":"September 2012","author":"PayU Payment Solutions (Pty) Ltd","copyright":"Copyright (C) 2012 PayU. All rights reserved.","authorEmail":"integration@payu.co.za","authorUrl":"http:\/\/www.payu.co.za","version":"1.0","description":"<a href=\"http:\/\/www.payu.co.za\" target=\"_blank\">PayU<\/a> ","group":""}', '', '', '', 0, '0000-00-00 00:00:00', 0, 0); |
|---|
3. Virtuemart Payment Gateway Setup
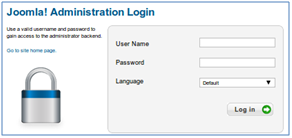
Login to the Joomla administration interface.
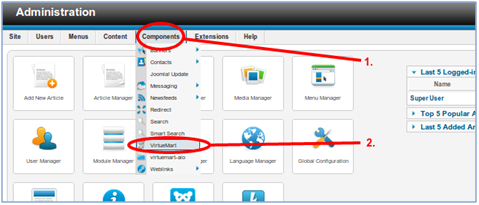
Once logged in, select Components > Virtuemart from the main administration menu at the top of the page.
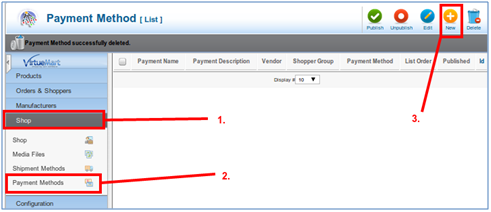
Once on the Virtuemart configuration interface, click on Store > Payment Methods > New.
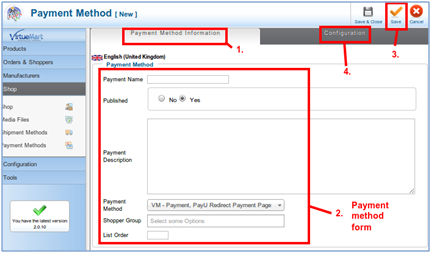
The Payment Method Form (2.) configuration options for a PayU configuration are:
Configuration Option | Description |
Payment Name | What should be displayed on the frontend to the customer making a payment e.g. Credit Card (Processed by PayU) |
Published | Determines if PayU should be available as a payment option on the frontend (checkbox ticked = yes/active) |
Payment Description | A description of the payment method |
Payment Method | In the dropdown select 'VM - Payment, Payu Redirect Payment Page' |
Update the configuration by clicking on the Save (3.) icon and then click on Configuration tab to configure further, displayed below.
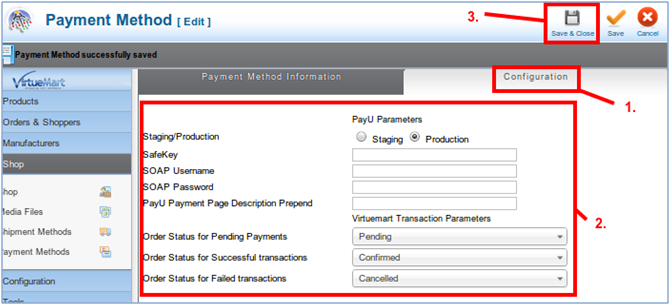
Configuration form options:
Configuration Option | Description |
Staging/Production | Radio indicating which PayU environment to use for transactions (Staging: used testing and integration, Production: used for live/real transactions) |
SafeKey | SafeKey in {XXXXXXXX-XXXX-XXXX-XXXX-XXXXXXXXXXXX} format: (Production value is provided by PayU, Staging value is entered automatically) |
SOAP Username | SOAP API Username used in transactions (Production value is provided by PayU, Staging value is entered already and can't be updated) |
SOAP Password | SOAP API Password used in transactions (Production value is provided by PayU, Staging value is entered already and can't be updated) |
PayU Payment Page Description Prepend | This value is added before the order number and sent to PayU with transactions and will display on invoices |
Order Status for Pending Payments | This status will be given to an order once the customer click on the Pay button before redirecting to PayU for payment (By default set to: Pending) |
Order Status for Successful Payments | This status will be given to an order once the customer has done a successful payment on the PayU payment interface and successfully redirected back to the merchant’s website. (By default set to: Confirmed) |
Order Status for Failed/Cancelled Payments | This status will be given to an order if an error/decline was issued by PayU during the payment process once redirected once the customer has been successfully redirected back to the merchant’s website. |
Click on Save.
Once saved, proceed your store front end and follow the purchase process on the frontend.